Performance & Architecture
Modern
Mobile Application
Mobile Application
From Frame Budget to Clean Architecture
Users do not care about our pattern names. They only feel whether the app is smooth or not.
This session builds a first-principles mental model: from Flutter's render pipeline to why architecture matters as apps scale.
This session builds a first-principles mental model: from Flutter's render pipeline to why architecture matters as apps scale.
Frame Budget
→
Three Trees
→
Rebuild Control
→
Architecture
→
Multi-Package
5
Sections
45
Minutes
E2E
Mental Model
Agenda
⚡
Section 1 — Frame to Pixel
Flutter rendering pipeline and frame budget
🌳
Section 2 — Flutter Three Trees
Widget, Element, RenderObject, and lifecycle
🔧
Section 3 — Performance Practice
const, keys, state quality, and rebuild control
🏗️
Section 4 — Architecture Foundations
SoC, dependency direction, and dependency injection
📦
Section 5 — Pattern & Scaling
Repository, use case & multi-package
What Users Actually Feel 👋
Users do not care whether you use BLoC or Riverpod. They care about one thing only: does this app feel smooth or janky?
🏃
Smoothness
Users perceive 60 FPS as normal. Dropping to 30 FPS immediately feels laggy.
👆
Responsiveness
A tap delay of around 100ms is enough to create frustration and reduce confidence in app quality.
🔋
Consistency
A sudden stutter in a smooth flow feels worse than a consistently low but stable frame rate.
🤔 Think about your own experience: Hands up if you have ever used an app that felt laggy even with fast internet. That feeling is exactly what we are unpacking today.
The Anatomy of Smoothness: Pixel vs Frame
Smoothness is an optical illusion: your screen cannot show motion, only many static images in rapid sequence.
🟦
Pixel (Spatial)
The smallest physical unit on the display. It only knows color and position.
🎞️
Frame (Temporal)
A full snapshot made of millions of pixels at a specific moment in time.
1080p
Over 2 million pixels
1 Frame
One complete image snapshot
Late page
Illusion breaks → jank
📘 Flipbook analogy: UI smoothness works exactly like a flipbook. Your brain stitches frame after frame into motion. If one page opens late, the illusion breaks. Users feel that break as lag or jank.
🎯 To preserve that motion illusion in our digital flipbook, we must keep delivering new frames continuously. How fast must we render and color millions of pixels before the screen asks for the next frame? That is where the Frame Budget begins.
Frame Budget & Deadline ⏱️
If smoothness is the symptom, frame time is the root metric. Every frame has a strict budget.
📐 Fundamental Per-Frame Formula
Tframe
=
Tbuild
+
Tlayout
+
Tpaint
+
Traster
+
Tmisc
Hard rule: if total Tframe exceeds the device budget, jank will inevitably happen.
60 Hz
≈ 16.67 ms/frame
120 Hz
≈ 8.33 ms/frame
> Budget
= Jank is guaranteed
VSync
Display sync signal
🚀 Now we know the hard deadline. The next question is: how does Flutter produce one frame from Dart code into pixels on screen?
Section 1 of 10
Frame to Pixel
How Flutter transforms your Dart code into physical pixels on screen — the complete rendering pipeline from build() to GPU rasterization.
The Big Picture 🖼️
Every frame you see on a mobile screen goes through four distinct phases — each one transforming your code closer to actual pixels.
🔨 Build
→
📐 Layout
→
🎨 Paint
→
⚡ Raster
Phase 1 — Build 🔨
The Build Phase is where build() composes the next UI state as an abstract blueprint before any sizing, positioning, or drawing happens.
💡 The build phase is declarative — you describe what the UI looks like, not how to make it.
Phase 2 — Layout 📐
Layout computes size and position for each element.
⬇️ Constraints Down, Sizes Up ⬆️
Scaffold
maxW: 390, maxH: 844
↓
constraints
↓
Column
390 × 600
AppBar
390 × 56
↑
sizes
↑
Phase 3 — Paint 🎨
Paint converts layout output into drawing commands for the GPU.
💡 Paint turns layout output into draw commands, not final pixels. Pixels are produced in Raster.
Phase 4 — Rasterization ⚡
The Raster Phase is where the GPU turns drawing commands into actual physical pixels on your device screen.
⏱️ Frame Budget
~4ms
Build
~4ms
Layout
~4ms
Paint
~4ms
Raster
Total budget: 16ms per frame for 60 FPS | 8ms for 120 FPS
⚡ Jank happens when any phase exceeds its budget. Use Flutter DevTools → Performance Overlay to identify which phase is the bottleneck.
The Complete Pipeline 🔄
Here is the full journey from your Dart code to the pixels you see on screen.
🎯
Optimization Tip
Use const widgets, RepaintBoundary, and avoid unnecessary rebuilds to keep each phase under budget.
🔍
Debug Tool
Flutter DevTools Performance Overlay shows UI thread (Build+Layout+Paint) and Raster thread separately.
📱
Target
60 FPS = 16ms budget per frame. 120 FPS = 8ms. Every millisecond counts for smooth scrolling.
🚀 Flutter's rendering pipeline runs on two threads: the UI thread (Build + Layout + Paint) and the Raster thread (GPU execution) — enabling true parallel processing.
Bottleneck Map 🗺️
Pipeline understood. Now let's classify: where exactly can time be exhausted?
🔥
Type A: CPU-bound
Main isolate choked by heavy synchronous work:
• Parsing massive JSON payload
• Sorting thousands of records
• Encryption/hashing on UI thread
• Parsing massive JSON payload
• Sorting thousands of records
• Encryption/hashing on UI thread
Symptom: UI total freeze, unresponsive taps
🔄
Type B: Rebuild/Layout
Rebuild scope is too wide for small changes:
• Huge parent rebuilds
• IntrinsicWidth forcing double layout
• Monolithic state triggering the whole page
• Huge parent rebuilds
• IntrinsicWidth forcing double layout
• Monolithic state triggering the whole page
Symptom: Janky scroll when data changes rapidly
🎨
Type C: Paint/Raster
GPU overwhelmed by overly fancy visual effects:
• Stacked Opacity + Shadows
• Layered BackdropFilter / Blur
• Overdraw from transparent elements
• Stacked Opacity + Shadows
• Layered BackdropFilter / Blur
• Overdraw from transparent elements
Symptom: Heavy animations, but UI thread is healthy
🤔 Let's dissect this scenario: If scrolling feels janky right when the app is parsing a massive JSON payload — according to the classifications above, which bottleneck type does this issue fall into?
🌳 To properly control this bottleneck, we must understand Flutter's structure and lifecycle under the hood.
🚀 Next up: Flutter Three Trees — Widget, Element & RenderObject
Section 2 of 10
Flutter Three Trees
Understanding Flutter performance means understanding the three layers that run every frame — Widget, Element, and RenderObject.
Deep Dive: Three Layers 🔬
Each layer has vastly different characteristics and computational costs.
📝 Widget created
→
🔗 Element matches
→
🎨 Render calculates
→
📺 Pixels on screen
Timeline vs Actors ⏱️🎭
Now that the tree roles are clear, separate two dimensions: WHEN a frame runs vs WHO executes it.
⏱️
Pipeline (WHEN)
▶️ Chronological journey of a frame
▶️ Happens within the 16ms budget
▶️ Build → Layout → Paint → Raster
→
🎭
Three Trees (WHO)
👤 Data structures residing in memory
👤 The actors executing the pipeline
👤 Widget → Element → RenderObject
💡 The Build phase is handled by Widgets & Elements. The Layout & Paint phases are executed entirely by the RenderObject.
Where They Intersect 🔍
Let's peel back the curtain and see exactly WHO does WHAT during the 16ms timeframe.
🔨
1. Build Phase
Actors: Widget & Element.
The blueprint is formed. build() executes. The cheap Widget Tree is generated, and the Element Tree performs reconciliation.
The blueprint is formed. build() executes. The cheap Widget Tree is generated, and the Element Tree performs reconciliation.
📐
2. Layout Phase
Actor: RenderObject.
Widgets and Elements sit back. The Render Tree takes over to execute constraints down, sizes up.
Widgets and Elements sit back. The Render Tree takes over to execute constraints down, sizes up.
🎨
3. Paint Phase
Actor: RenderObject.
With sizes confirmed, the RenderObject paints colors, text, and borders into a Display List (Layers).
With sizes confirmed, the RenderObject paints colors, text, and borders into a Display List (Layers).
⚡
4. Raster Phase
Actor: GPU Engine (Impeller).
The Three Trees are completely hands-off. The engine converts the Display List into physical screen pixels.
The Three Trees are completely hands-off. The engine converts the Display List into physical screen pixels.
Reconciliation: The Heart of Updates 🫀
When state changes, Flutter doesn't automatically tear down the UI. It matches old and new nodes using three signals.
🏷️
runtimeType
Is the widget type still the same?
Container vs Column = different
Container vs Column = different
📍
Position
Child slot order in parent
The 2nd child remains the 2nd child
The 2nd child remains the 2nd child
🔑
Key
Explicit identity from developer
Mandatory when lists move/reorder
Mandatory when lists move/reorder
⚙️ canUpdate Rule
type match + key match
→
✅ Update/Reuse
type / key mismatch
→
🔄 Remount Subtree
💡 Flutter does not tear down the entire UI when state changes. It performs reconciliation: matching old and new nodes based on runtimeType + key.
Element Lifecycle 🔄
Elements don't live and die as fast as Widgets. They have a lifecycle with real performance implications.
🧭 Let's test your intuition: Based on the reconciliation above, if a widget changes from Container to SizedBox, which path will Flutter take — Update or Unmount→Mount?
🔧 Now you understand the engine. Next up: concrete techniques you can use immediately — const, key, state quality, rebuild control.
🚀 Next up: Performance Practice — const, keys, state quality & rebuild control
Section 3 of 10
Performance Practice
From the three trees theory, we now enter techniques that can be applied immediately — without deep tuning.
const, Key, & State Quality 🎯
These three concepts are often cited but rarely understood why they work. The key lies in our understanding of the three layers.
⚠️ Remember:
const doesn't solve every performance issue. If the bottleneck is in heavy layout or GPU raster, adding const is not enough.
Rebuild Control: Precision, Not Castration 🎯
Our architectural optimization goal is not to eliminate rebuilds, but to make them precisely targeted.
❌
Anti-Pattern
❌ One setState → rebuilds entire page
❌ Monolithic state mixing all concerns
❌ Listener at Page level, not leaf level
❌ Heavy computations inside build()
→
✅
Best Practice
✅ setState only on widgets that change
✅ State separated by update frequency
✅ Listener (BlocBuilder) at the leaf level
✅ Computation in BLoC/ViewModel, not build()
Four Rebuild Control Tactics 🛡️
Concrete strategies you can apply right away — from the easiest to the most impactful.
1
Separate by Update Frequency
Static elements (title, desc) shouldn't be in the same widget as dynamic elements (timer, counter). Split the subtree.
2
Listeners at the Leaf
Place BlocBuilder/Consumer as close as possible to the changing widget. Do not wrap the whole Card.
3
Selector / buildWhen
Use context.select() or BlocSelector to subscribe only to specific data. Rebuild only if that exact piece changes.
4
Keep build() Light
Avoid sorting, formatting, or heavy compute in build(). Move them to BLoC/Controller — build() should only compose UI.
💡 Rebuilds are not the enemy. Rebuilds are the heartbeat of Flutter. What is dangerous is an excessively huge rebuild radius that is disproportionate to the actual visual change.
DevTools: Observing, Not Guessing 🔍
Performance can be measured, not guessed. Just know these three things.
📊
Frame Chart
Duration history of each frame
Tall bar = frame exceeded budget
Tall bar = frame exceeded budget

Answers: WHEN did jank happen?
🔥
Flame Chart
Function hierarchy call stack
Widest block = bottleneck
Widest block = bottleneck
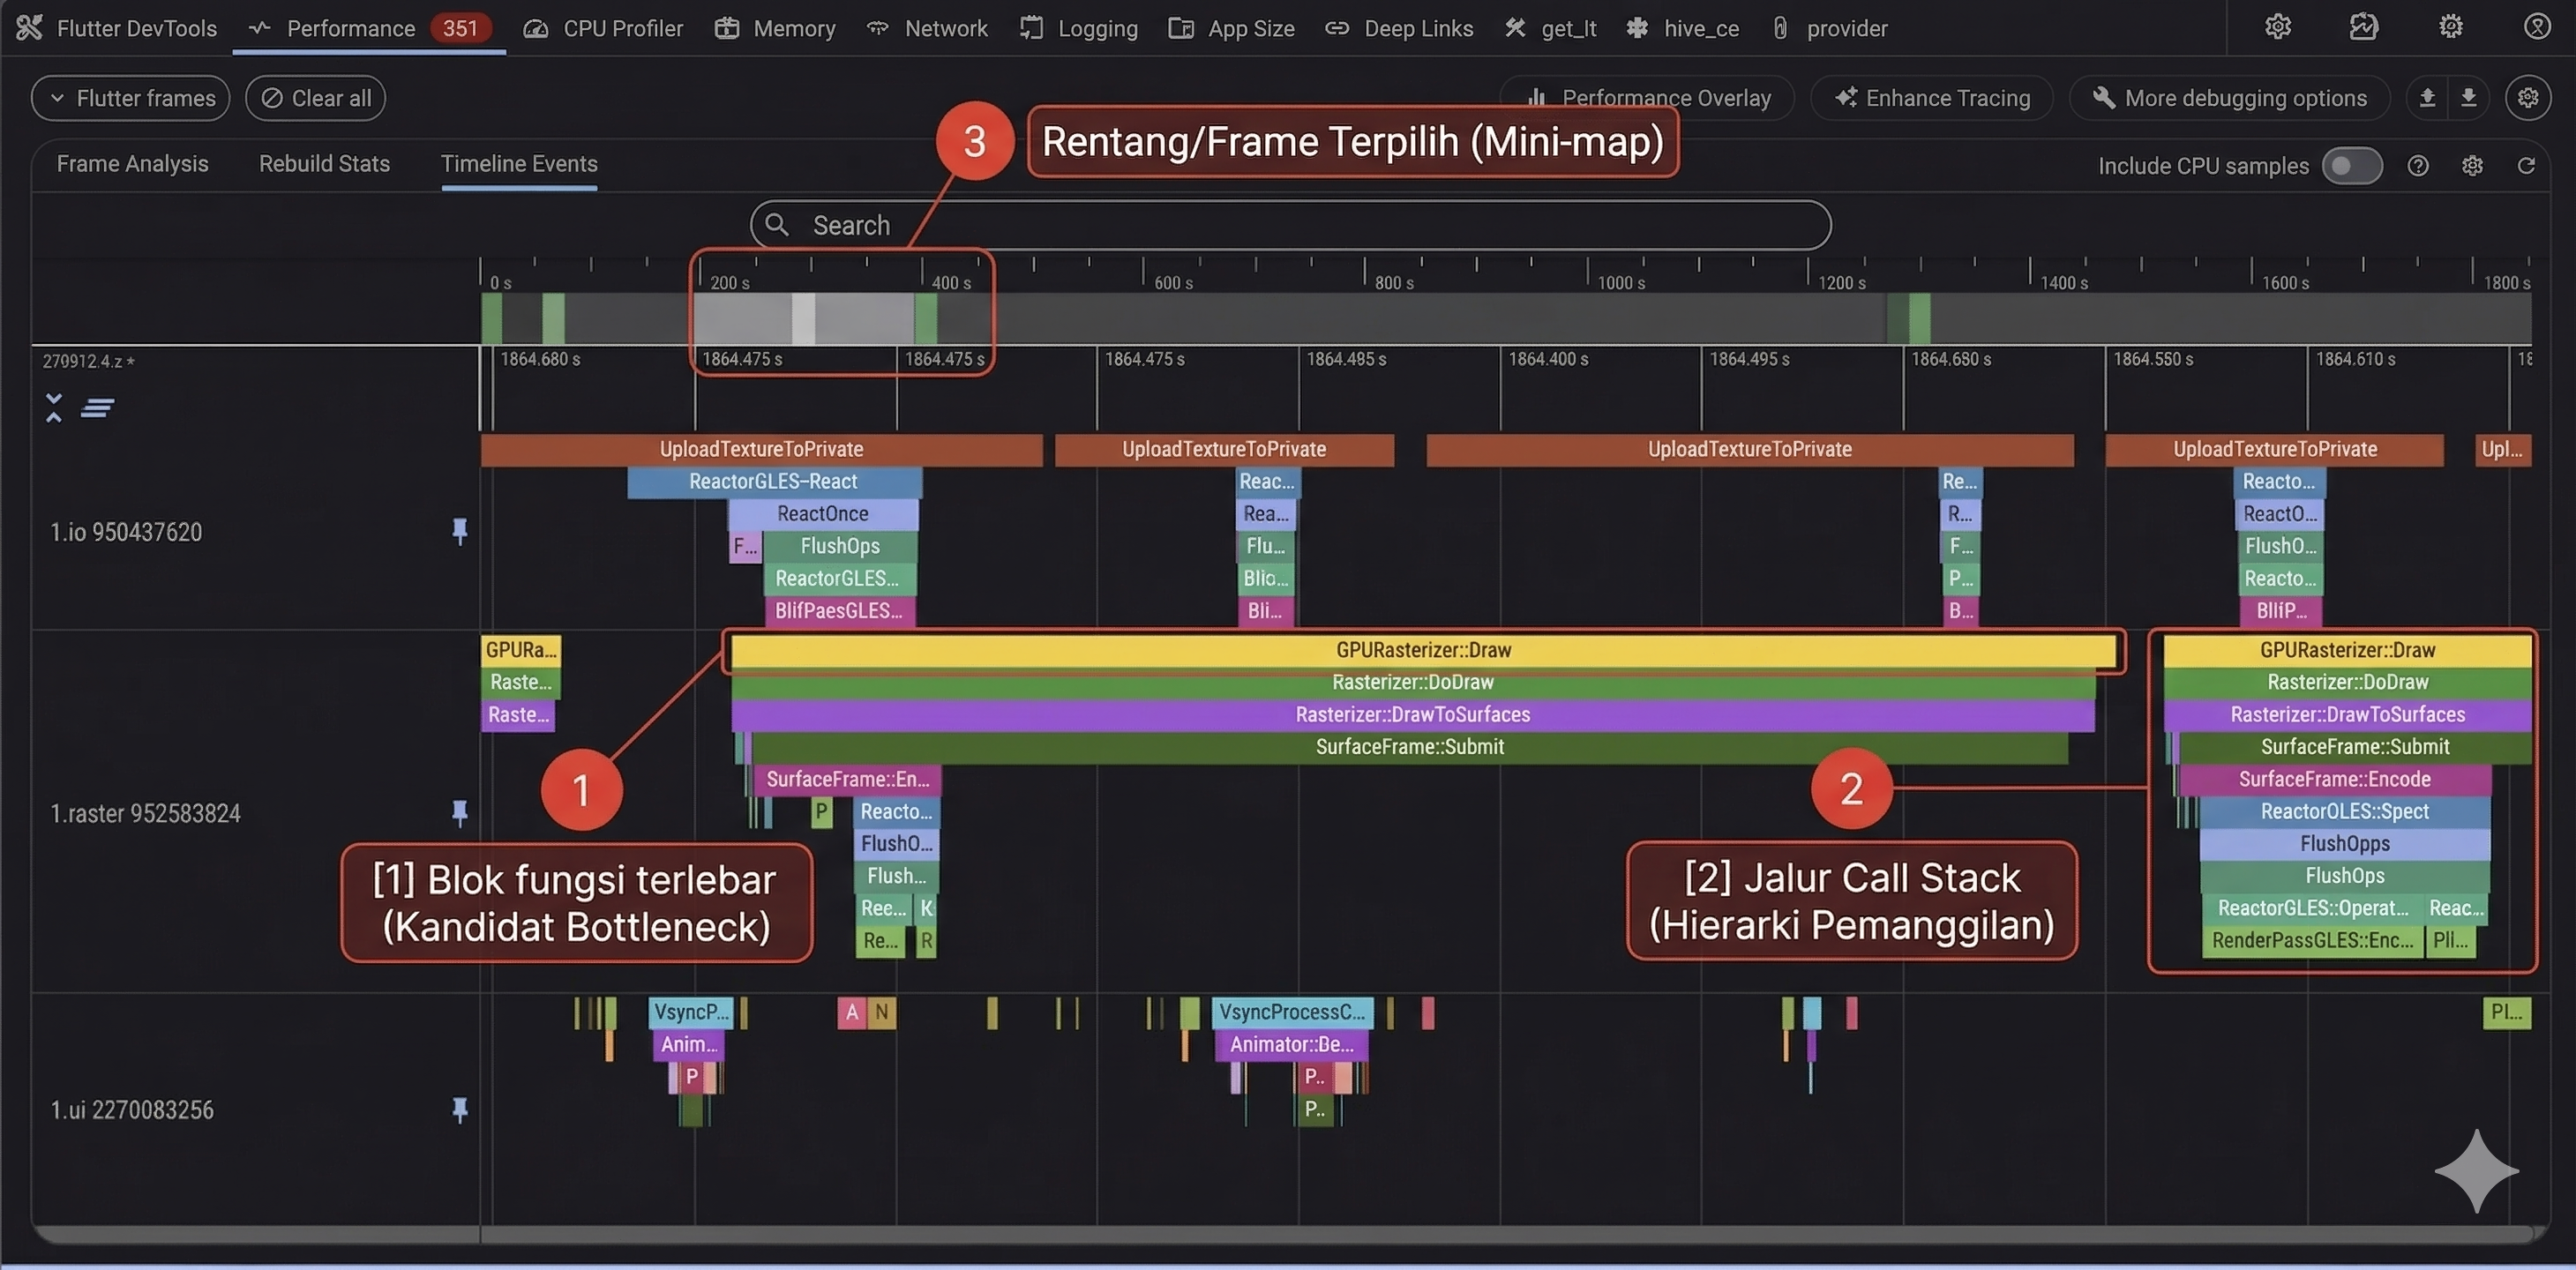
Answers: WHY did jank happen?
🔁
Rebuild Profiling
Monitor which widgets rebuild
Widget Rebuild Stats in DevTools
Widget Rebuild Stats in DevTools
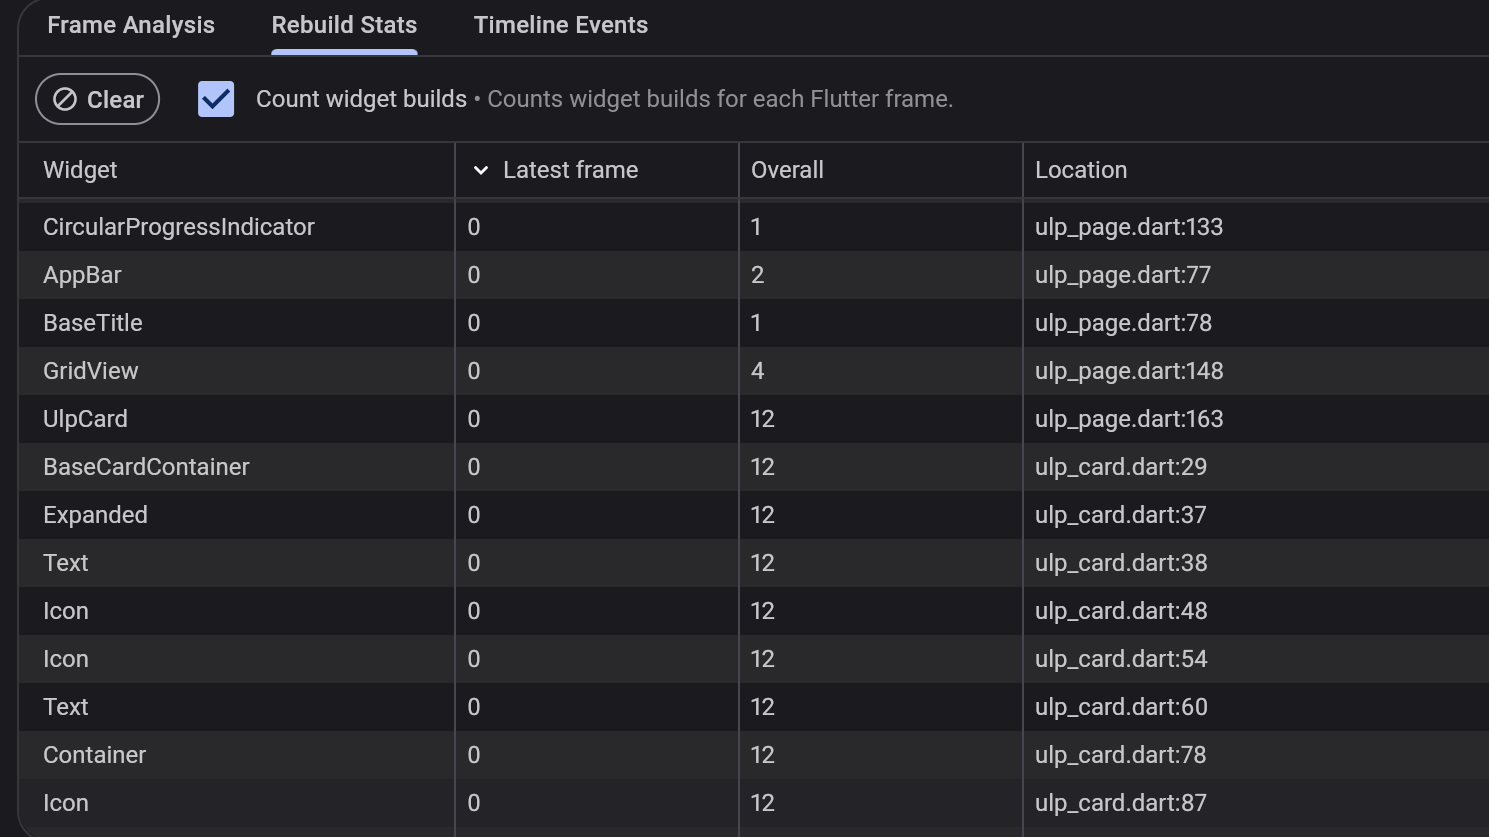
Answers: WHAT rebuilds too often?
👀 Observe Symptom
→
📊 Identify Phase
→
🔥 Root Cause (Flame)
→
🔧 Targeted Fix
→
📏 Re-verify
🎯 Performance is not a cosmetic task polished after features are done. Performance is a direct consequence of architectural decisions made from day one.
🚀 Next up: Architecture Foundations — from frame efficiency to team efficiency
Section 4 of 10
Architecture Foundations
If performance is about per-frame efficiency, architecture is about team efficiency and code evolution per month.
Bridge: From Performance to Architecture 🌉
We've understood how one frame is born to become pixels. Now the question is: what happens when the app scales?
📈
Feature Growth
Dependencies grow exponentially as new features arrive
👥
Team Growth
Without boundaries, merge conflicts and ownership get muddy
🔄
Changing Req.
Backend changes breaking the UI because of tight coupling
💥
Maintenance Cost
Without structure, maintenance costs explode over time
🏗️ Architecture is not an overhead for small projects. Architecture is an investment that pays for itself when the application grows complex.
Three Architectural Pillars 🏛️
Architectural foundations are built from three mutually reinforcing principles.
Separation of Concerns — Detail 🧩
One place should do one type of job. If one file handles UI, business logic, and networking together — a small change breaks everything.
🚨
Leaky Boundary
❌ Widget calling HTTP client directly
❌ Domain entity has JSON parser
❌ Core class naming feature specifics
→
✅
Healthy Boundary
✅ Domain runs without UI framework
✅ Outer details can change without touching the core
✅ UI only knows state and intent
✅ Core generic and reusable across features
🔍 Let's evaluate: Based on the arrow flow rules above, is a class in the domain layer allowed to call a class from the data layer? Yes or No — and try to think why?
Dependency Direction — Arrow Flow ⬆️
Parts that frequently change should depend on stable parts. But stable parts must never depend on frequently changing parts.
🖥️ Presentation Layer
UI, Screen, Widget — frequently changing
↓
depends on
↓
🎯 Domain Layer
Core rules and shared meaning — highly stable
↑
implements
↑
💾 Data Layer
API, Database, Cache — frequent implementation changes
1
Outer details change
Won't force core changes — adjust the edge layer instead
2
UI changes
Won't break the core idea — the foundation stays intact
3
Testing core logic
You can isolate the core from external systems when testing
Dependency Injection — Proper Wiring 💉
If a class constructs all its own needs, the class becomes hard to test and hard to replace its behavior.
🎛️
Wiring Point
A central point for dependency registration:
main.dart or startup file — central setupDI tool — stores and provides instancesbootstrap() — app initialization
⏱️
Lifecycle Patterns
Singleton — shared everywhere, one instance
Lazy Singleton — created on first initialization
Factory — newly created every time (great for screen-scoped BLoC)
Pre-resolve — async setup before use
Lazy Singleton — created on first initialization
Factory — newly created every time (great for screen-scoped BLoC)
Pre-resolve — async setup before use
⚠️ Anti-Pattern: All classes calling the container directly from anywhere. Domain must not know the container or DI framework — only fetch dependencies in the integration layer.
📦 Three pillars are now standing. Next we connect them to the more concrete patterns that make apps easier to organize as they grow.
🚀 Next up: Next Section — Concrete Patterns
Section 5 of 10
Pattern & Scaling
Repositories and use cases keep business flows explicit. Multi-package keeps structures intact as teams and features scale.
Repository & Use Case 📋
The UI should not fetch data arbitrarily — and business rules shouldn't be scattered all over the place.
🔄 Data Flow: UI → Use Case → Repository → Data Source
🖥️ UI
calls
🎯 Use Case
validate & orchestrate
🚪 Repository
domain contract
💾 Data Source
API, DB, Cache
1
UI Knows No Infra
No need to know if data is from an API, local DB, or cache — simply call the use case.
2
Readable Domain
List of use cases = list of business capabilities. GetTodosUseCase, CreateOrderUseCase, etc.
3
Focused Scenarios
Test business flows just by mocking the repository — no network/database setup required.
Multi-Package: Advanced Scaling 📦
If clean architecture is the mindset for internal structure, multi-package is the strategy for scaling codebases and team ownership.
✅ Benefits
Boundaries — Enforced at the package level
Ownership — Highly clear who owns which module
Selective CI — Build, test, analyze per package
Reusability — Packages can be used across apps
⚠️ Tradeoffs
Setup — More complex than a single package
Versioning — Package coordination needs governance
Overhead — Initial costs only pay off at scale
Discipline — Frequent boundary reviews required
Anatomy of a Monorepo 📂
How do we actually divide the app? By extracting core services, reusable UI, and isolated features into their own decoupled packages.
core_services
HTTP, logging, error
core_database
persistence, migration
core_ui
theme, design tokens
feature_auth
domain + data + UI
feature_todo
domain + data + UI
lib/main.dart
orchestrator + bootstrap
📦 Multi-package is an advanced scaling strategy, not an initial requirement. Start simple, split when boundaries and ownership feel like they must be enforced.
🎉 The journey from render phase to large-scale architecture is complete. Before we wrap up, let's lock in the 3 main takeaways.
🚀 Next up: Takeaways & Journey Recap
Key Takeaways 💎
Three things to remember after this session ends.
⚡
Performance = Engine Understanding
Good performance comes from understanding the render engine, not just memorizing tips.
Frame budget, three trees, element lifecycle — all form the correct mental foundations about performance.
Frame budget, three trees, element lifecycle — all form the correct mental foundations about performance.
🏗️
Architecture = Boundary Discipline
Good architecture comes from strict responsibility boundaries and dependency direction.
SoC, dependency direction, and DI keep the codebase healthy as scale increases.
SoC, dependency direction, and DI keep the codebase healthy as scale increases.
📦
Multi-Package = Advanced Scaling
Multi-package is an advanced scaling strategy, not an initial requirement.
Start simple, increase structural discipline only when you have measured pains.
Start simple, increase structural discipline only when you have measured pains.
🎯
Mental Models > Tricks
This session targeted foundational thinking, not a tuning workshop.
If the mental model is strong, optimization techniques and architectural patterns will logically make sense.
If the mental model is strong, optimization techniques and architectural patterns will logically make sense.
Our Journey 🗺️
A recap of everything we've covered today.
⚡
Frame to Pixel
Rendering pipeline — Build, Layout, Paint, Raster — and the 16ms frame budget.
🌳
Flutter Three Trees
Widget, Element, RenderObject — behaviors, costs, and lifecycles that govern performance.
🔧
Performance Practice
const, keys, state quality, rebuild control — from theory to actionable techniques.
🏗️
Architecture Foundations
SoC, dependency direction, and DI — keeping the system healthy as features and teams grow.
📦
Pattern & Scaling
Repository, use cases, Either pattern, and a teaser to multi-package monorepos.
Section 6 of 6
Knowledge Corner: FVM for Real Projects
No in-class mandatory setup: learn the concept first, then use FVM when your project requires strict SDK consistency.
Why We Place FVM at the End 🧭
To keep classroom time efficient, participants can practice using their current Flutter setup. FVM is introduced at the end as real-project readiness.
🚨 Without FVM
Different Flutter versions on each laptop
Mismatched dependency resolution
"It works on my machine" setup issues
Mismatched dependency resolution
"It works on my machine" setup issues
✅ With FVM
One team, one Flutter SDK target
Reproducible local setup for everyone
Easier onboarding for new contributors
Reproducible local setup for everyone
Easier onboarding for new contributors
🎯 Class strategy: practical work can run with each participant's current Flutter SDK, while FVM is introduced as an important tool for real team projects.
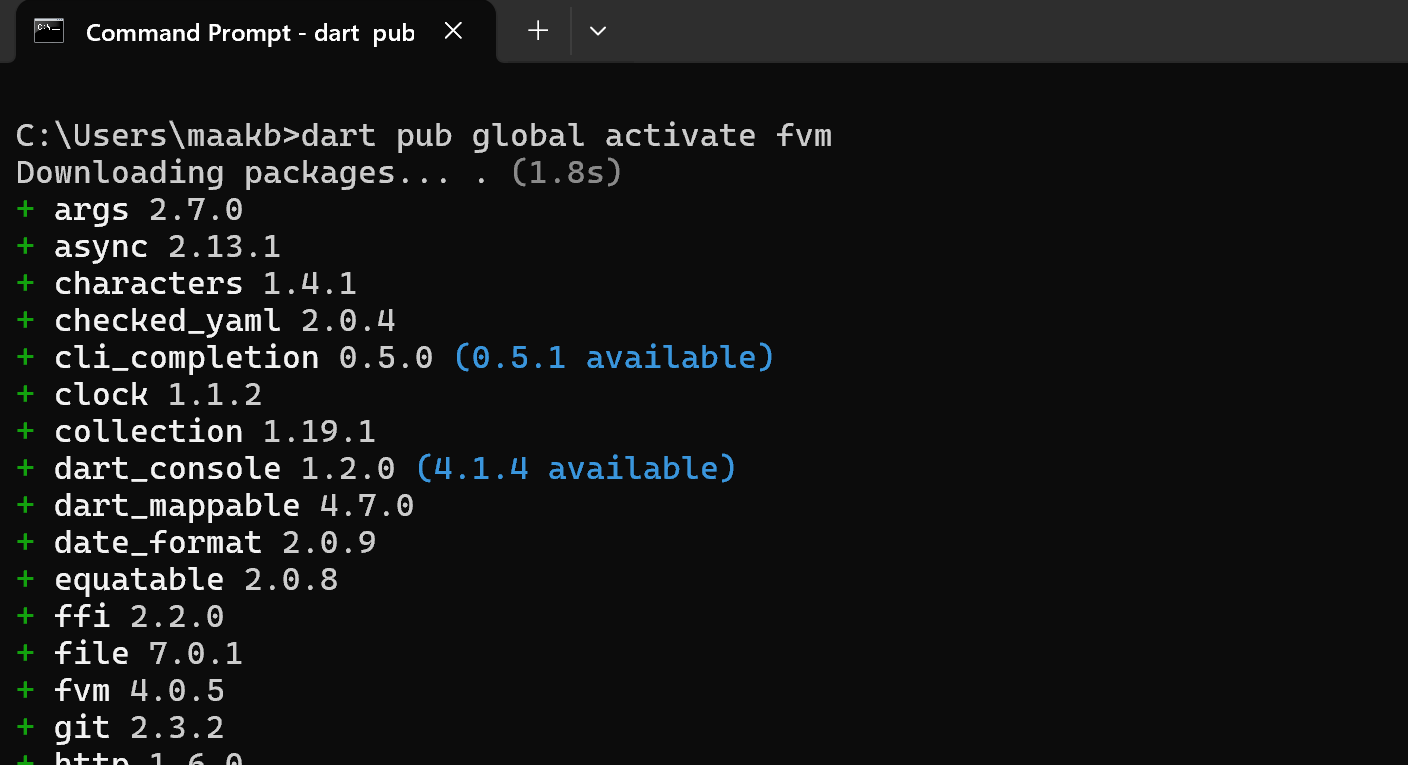
Optional Step 1 — Install FVM Globally 📦
For real projects, install FVM once on your machine, then verify the command is available from the terminal.
Run in terminal
dart pub global activate fvm
fvm --version
Expected: package installation logs and a valid FVM version output.
Reference Screenshot — Install FVM
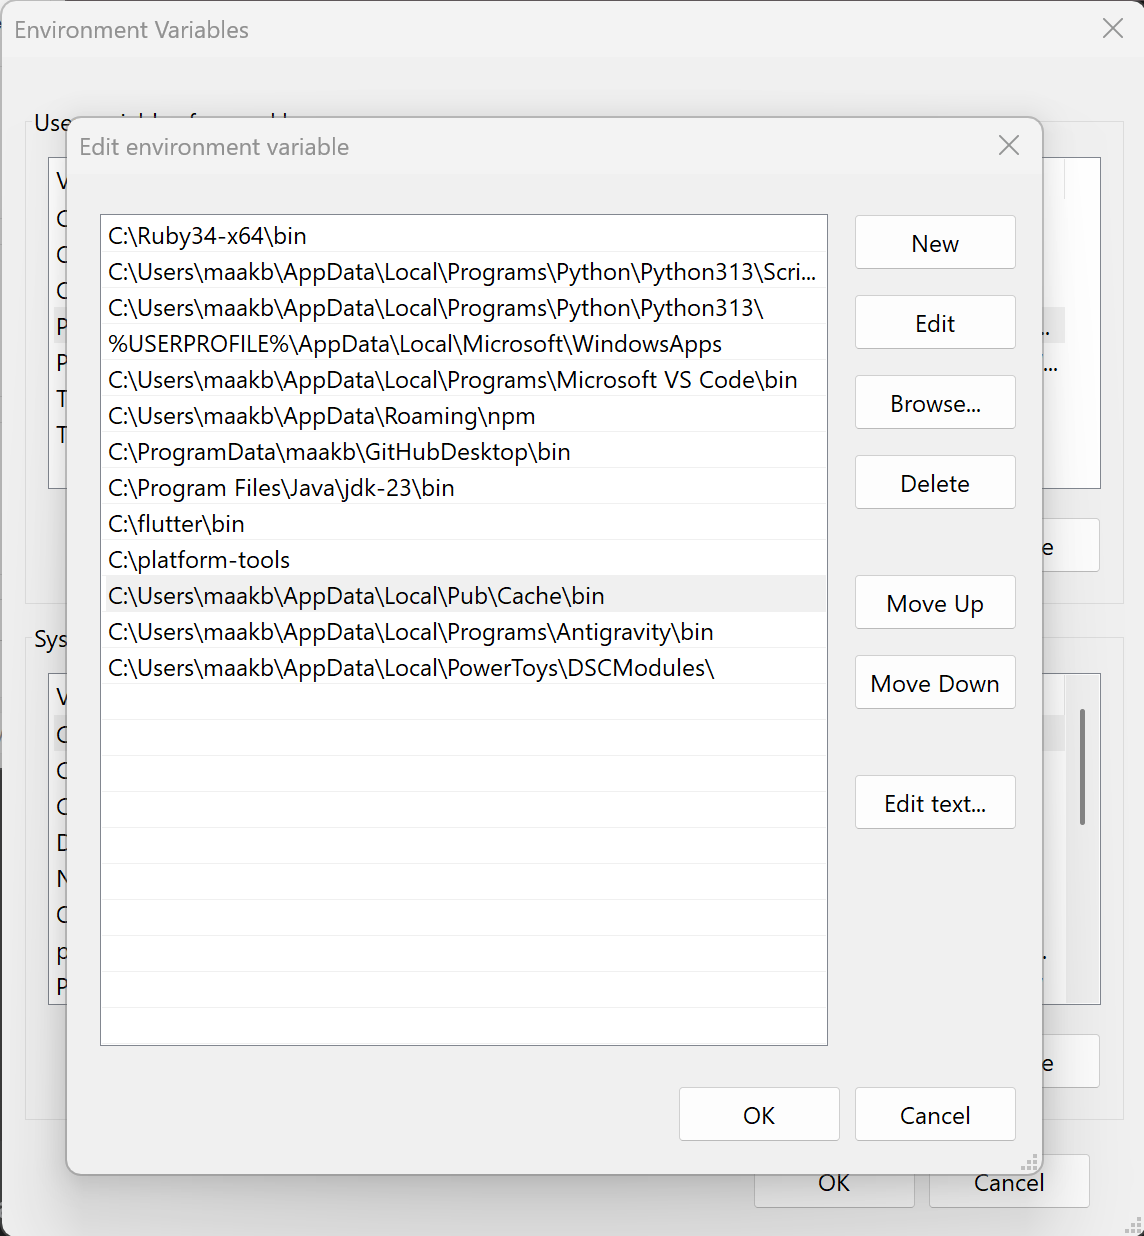
Optional Step 2 — Fix PATH If FVM Is Not Recognized 🛠️
If the terminal cannot find FVM, add the Dart pub cache binary path to your user environment variables.
Add this path to User PATH
%USERPROFILE%\AppData\Local\Pub\Cache\binAfter saving PATH, restart terminal and run fvm --version again.
Reference Screenshot — Edit Environment Variables
Optional Step 3 — Example Project Initialization 🧱
Use this example flow when your team starts a real project and wants to pin one Flutter SDK baseline.
Run in terminal
mkdir project-flutter
cd project_flutter
flutter create practice_notes_app
cd practice_notes_app
You can replace practice_notes_app with any snake_case project name used by your class.
Reference Screenshot — Create Project

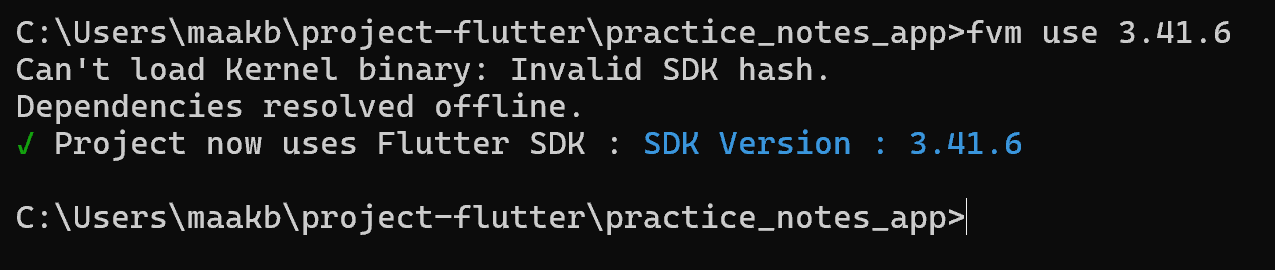
Optional Step 4 — Pin the Team Flutter SDK Version 🔒
Inside the project folder, lock a shared Flutter SDK version so everyone uses the same baseline.
Run in terminal
fvm use 3.41.6
fvm flutter --version
This creates project-level FVM config and downloads SDK if needed.
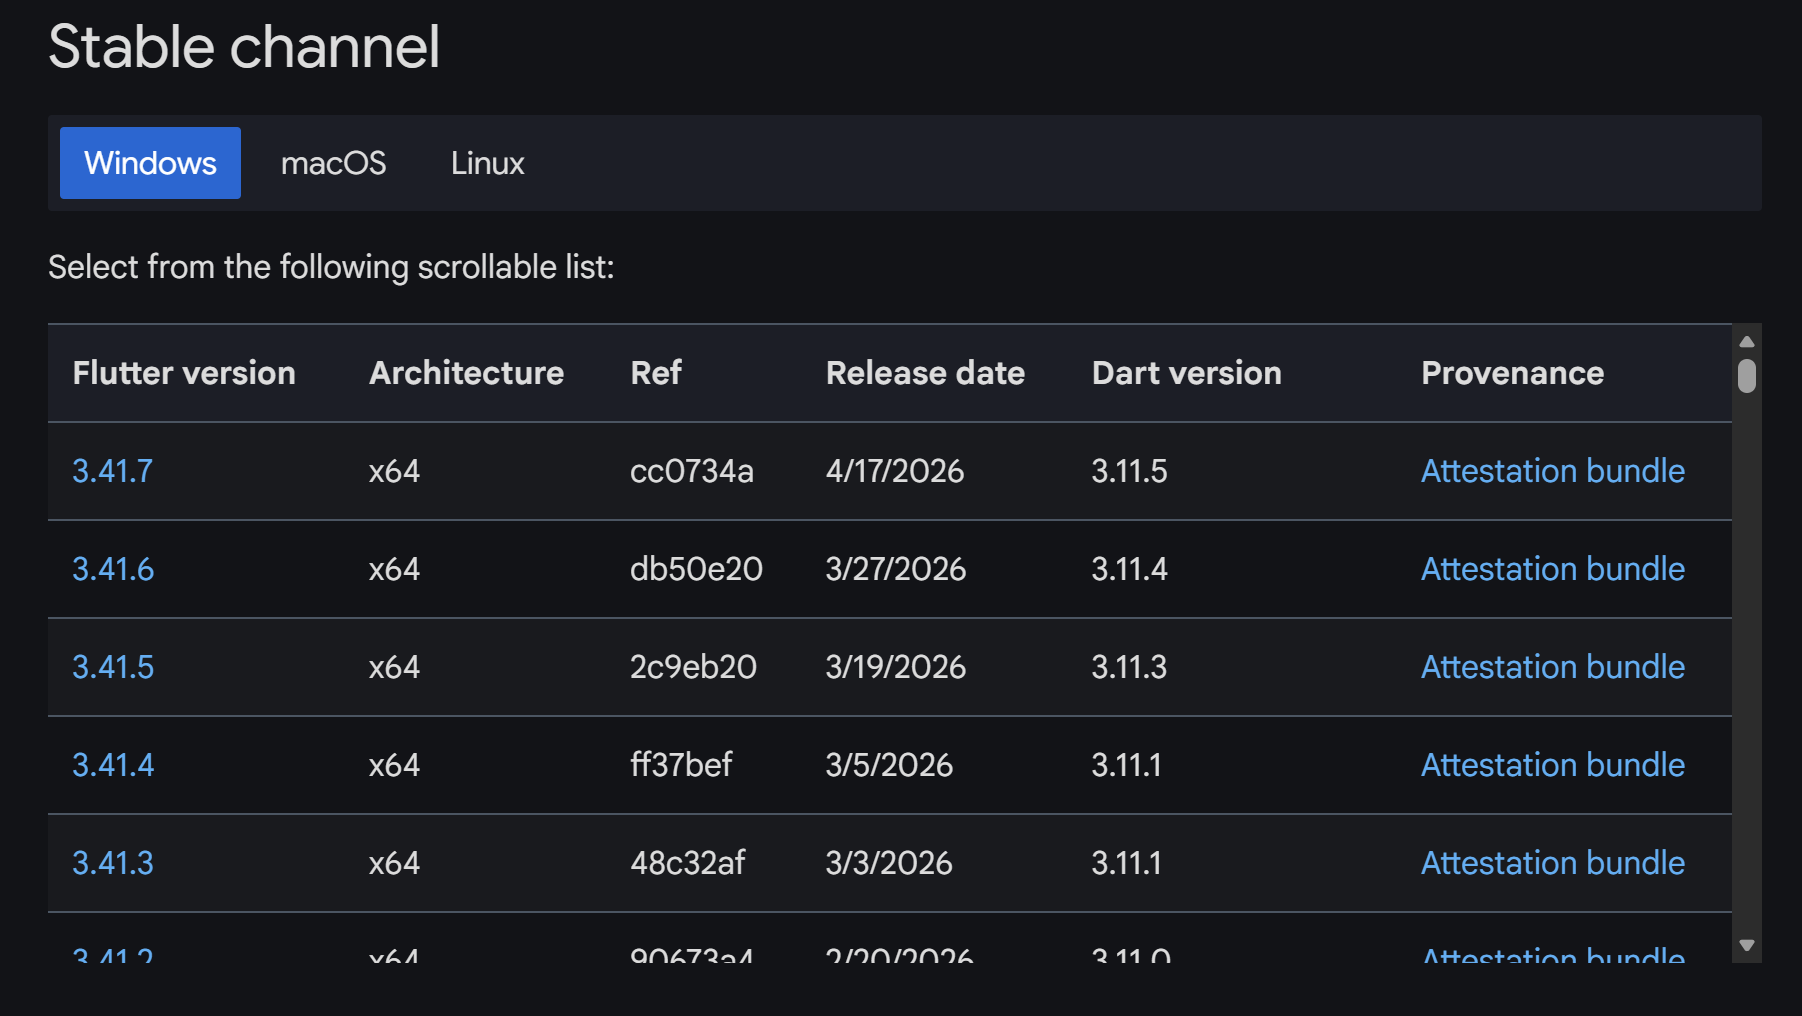
Step 5 — Check Latest Stable SDK
Source of truth for available Flutter versions:
https://docs.flutter.dev/install/archive
Pick one stable version for the class, then lock it with fvm use <version>.
https://docs.flutter.dev/install/archive
Pick one stable version for the class, then lock it with fvm use <version>.
✅ Key takeaway: participants understand when to apply FVM: shared team baseline, CI consistency, and onboarding in real production projects.
When Should Teams Actually Use FVM? 🤝
Use FVM when version drift creates friction across contributors, CI pipelines, and onboarding.
Good use cases
- Multiple contributors with different local Flutter versions.
- CI pipeline must match the exact local SDK baseline.
- Long-lived app where SDK upgrade should be deliberate and controlled.
- Onboarding needs one predictable command flow for all engineers.
In short: apply FVM when consistency cost is higher than setup cost.
Reference Screenshot — Team Consumption Flow
🚀 Next up: Continue with monorepo execution using Flutter and Melos in class.
Section 6 of 6
Practicum Corner: Monorepo Setup
After the multi-package concept, continue with a hands-on Melos workflow using each participant's current Flutter SDK.
Quick Intro — Melos After Multi-Package 🧭
Now that participants understand package boundaries, introduce Melos as the workspace orchestrator and move directly into practice.
🎯 Melos becomes easier to adopt after participants understand multi-package boundaries, because they can see exactly why workspace orchestration matters.
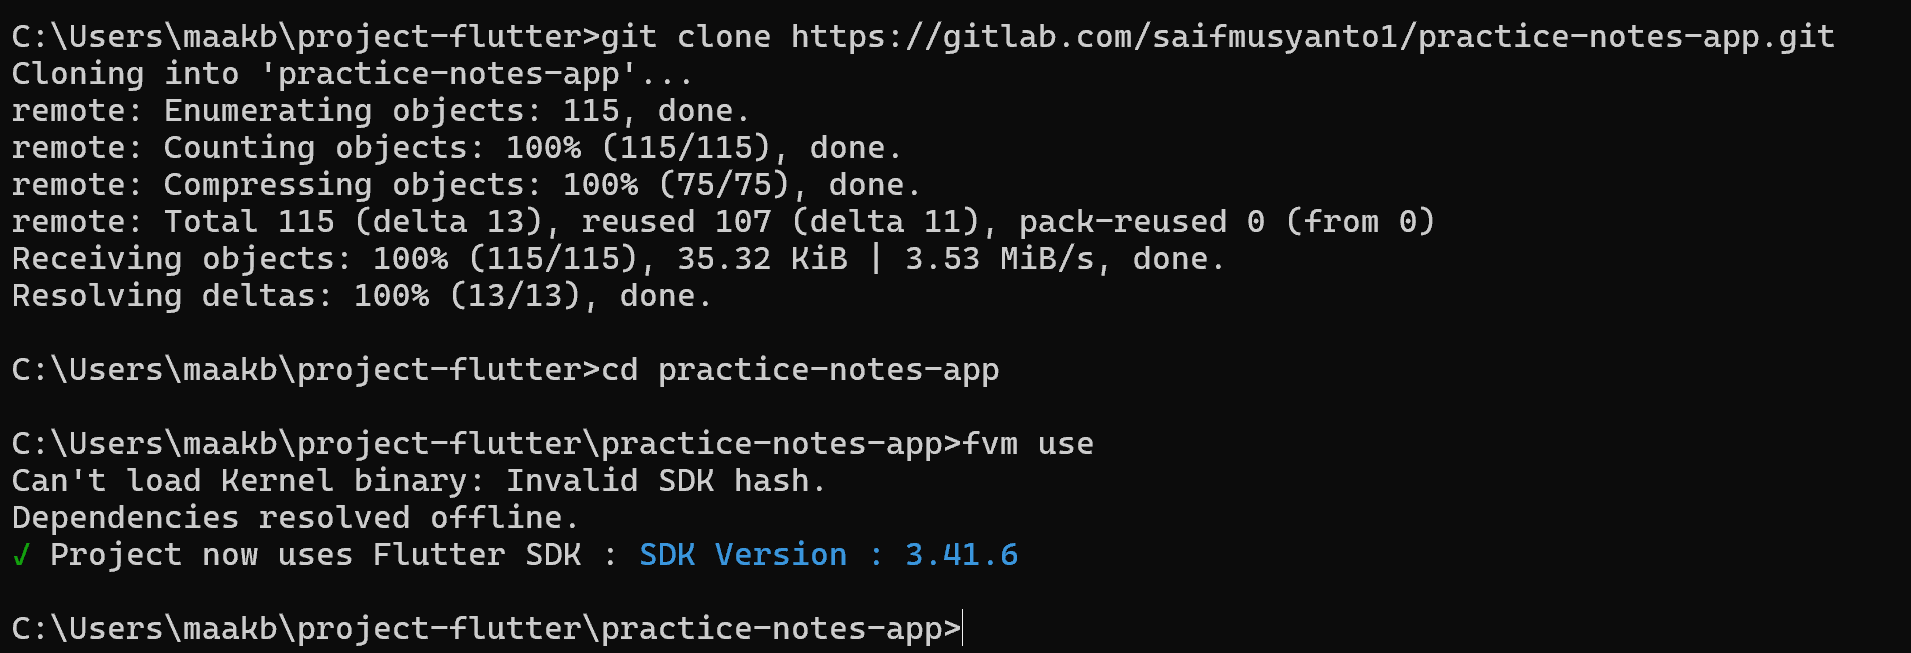
Step 1 — Create Project Root and packages/ Workspace 📂
After Melos introduction, create a fresh Flutter project first, then add one `packages/` workspace directory for all local modules.
Run in terminal
flutter create practice_notes_app
cd practice_notes_app
mkdir packages
cd packages
lib/ : app bootstrap (main.dart, routing, composition)
packages/ : all local packages (shared/core/feature modules)
packages/ : all local packages (shared/core/feature modules)
Reference Screenshot — Create project and packages folder

Expected result: project root is ready and terminal context is now inside packages/.
Step 2 — Initialize Local Packages 🧱
Use the Flutter `package` template so each package contains reusable code without platform folders (android/ios).
Run inside /packages
flutter create --template=package core_ui
flutter create --template=package core_services
flutter create --template=package note
Each package gets its own pubspec.yaml.
Reference Screenshot — Package creation output
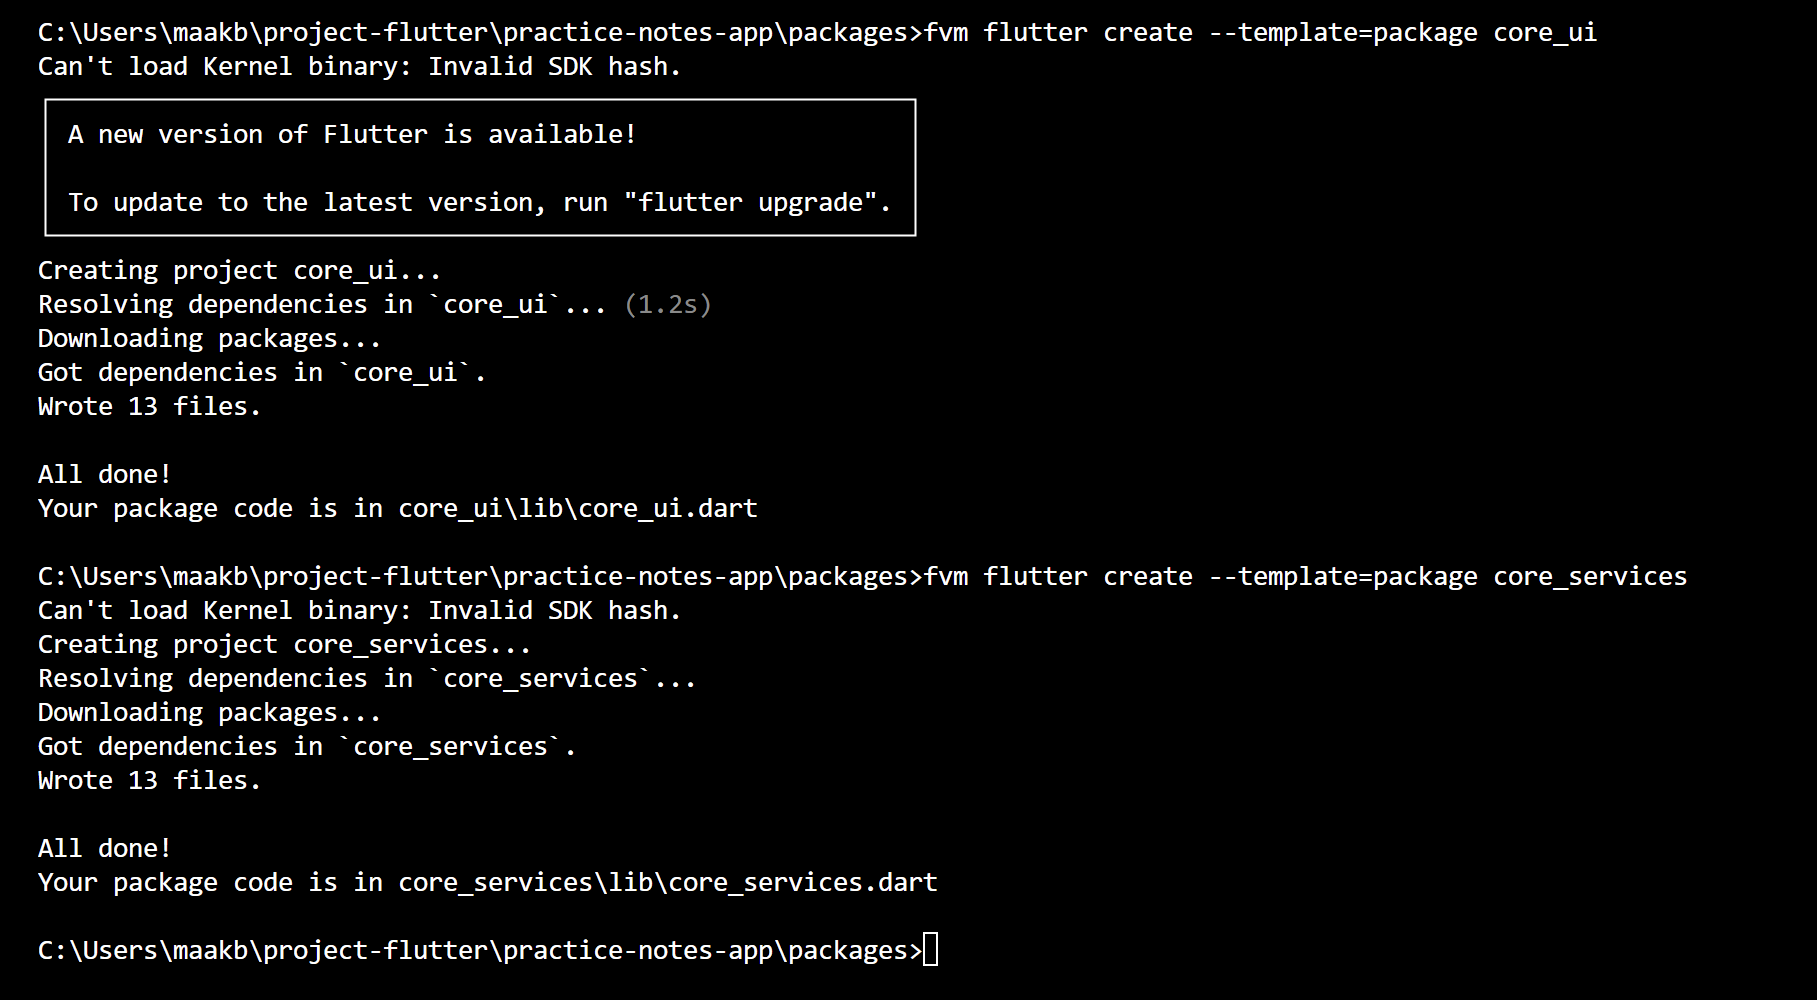
Expected result: each package is generated successfully with its own pubspec.yaml and lib/ entry file.
Step 3 — Why This Package Split Helps 📘
Before moving to Melos, make sure participants understand why we split into packages: clearer responsibility boundaries, easier testing, and safer scaling.
Responsibility map
core_ui: reusable UI primitives and design tokens.
core_services: shared services (API, storage, logging, utilities).
note: feature-specific workflows and domain behavior.
core_services: shared services (API, storage, logging, utilities).
note: feature-specific workflows and domain behavior.
Why teams benefit
- Smaller package scopes make code review and ownership clearer.
- Shared logic is reused once, not duplicated per feature.
- Testing and analyzer runs can target only affected packages.
- Workspace tooling (Melos) can execute commands consistently across all packages.
Step 4 — Architecture Roles: Root App vs Packages 📱
After package creation, the root `lib` remains the orchestrator, while reusable implementation lives inside `packages/`.
Monorepo role mapping
lib/main.dart acts as the orchestrator: app entry point, route shell, DI startup, and package composition.Reusable implementation is split into
core_ui, core_services, and note packages.
Checkpoint — Monorepo Roles
✅ Orchestrator:
✅ Foundation packages:
✅ Feature package:
lib/main.dart✅ Foundation packages:
packages/core_ui and packages/core_services✅ Feature package:
packages/note
Step 5 — Install Melos in Root 🧩
Install Melos as a local dev dependency so every teammate and CI run the same version.
Install command
dart pub add melos --dev
Local install keeps tooling reproducible and avoids dependency on globally installed versions.
- Command is committed as dev dependency in root pubspec.
- All teammates run the same Melos version through the project lockfile.
Reference Screenshot — Melos installation output

Step 6 — Configure Workspace and Scripts in pubspec ⚙️
Define workspace packages and register an analyzer command so participants can catch code issues early from the monorepo root.
Root pubspec.yaml
workspace:
  - packages/core_ui
  - packages/core_services
  - packages/note

melos:
  scripts:
    analyze:
      description: "Run Flutter analyzer across all workspace packages"
      run: dart run melos exec -- "flutter analyze"
Why introduce analyze here
name: core_ui
resolution: workspace- workspace: registers packages managed by Melos.
- analyze: catches unused imports, type mismatches, and lint issues earlier.
- exec: flutter analyze: runs the same analyze command for each package from one root command.
- resolution: workspace: aligns dependency solving across packages.
Step 7 — Verify Bootstrap 🚀
Run bootstrap from project root to connect workspace packages and install dependencies in one pass.
Bootstrap validation
dart run melos bootstrap

# expected hints
Running "flutter pub get" in workspace...
-> 3 packages bootstrapped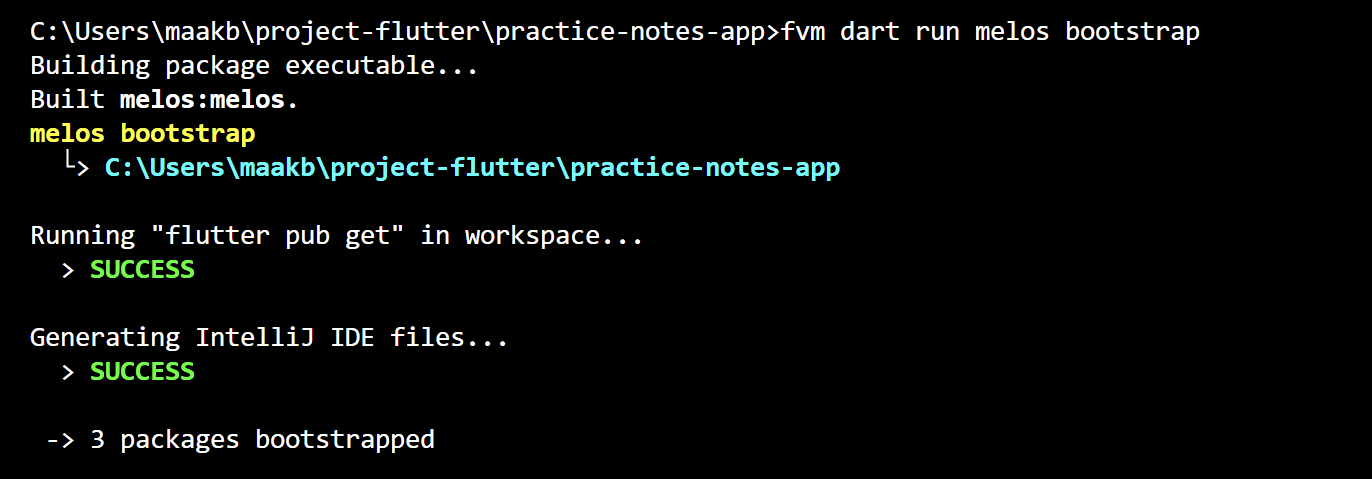
What bootstrap does
It discovers workspace packages, installs package dependencies, and links local packages so tooling resolves them as one monorepo.
Pass criteria
You should see workspace pub get success and package bootstrapped summary without dependency resolution errors.
Step 8 — Why Melos Helps in Practice ✅
Connected to Step 6: from one root terminal, Melos can run Flutter commands for all packages or only selected packages without directory hopping.
Command patterns from root
# use script alias from Step 6
dart run melos run analyze

# run one Flutter command for all workspace packages
dart run melos exec -- flutter analyze

# run only for one package (no cd needed)
dart run melos exec --scope="note" -- flutter analyze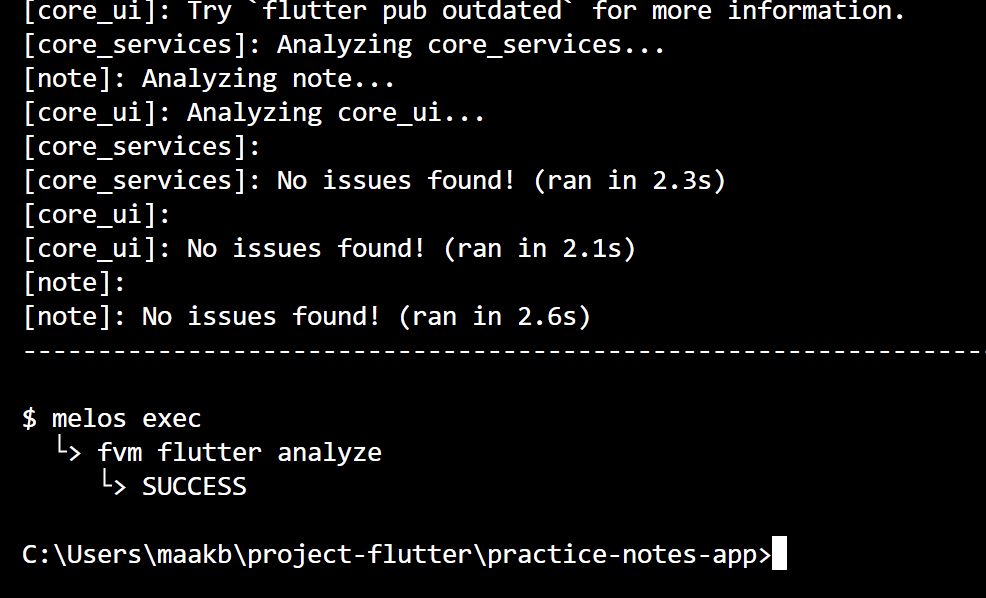
Melos benefits for classroom practice
- No directory switching: stay in root and still run package commands.
- One command, all packages: useful for quick class-wide health checks.
- Scope when needed: target one package with
--scope. - Consistent workflow: everyone executes the same command pattern from the same place.
Step 9 — Register Root Dependencies 🔗
To make local packages recognized by the main app, add path dependencies in the root pubspec, then run bootstrap.
Root pubspec.yaml dependencies
dependencies:
  flutter:
    sdk: flutter

  core_ui:
    path: packages/core_ui
  core_services:
    path: packages/core_services
  note:
    path: packages/note
After saving dependencies, run dart run melos bootstrap and the workspace links are ready.
✅ The core monorepo mechanism is path dependency: the root app links to local packages directly instead of downloading them from pub.dev.
🚀 Next up: The team is ready for HTTP client and API integration work!
Hand-off 🤝
🚀 Performance and architecture are the two pillars keeping mobile applications healthy. The next pillars — state management and API integration — will complete this big picture.
🚀
Thank You!
Hopefully today's mental foundations help you build healthier mobile apps — from the very first frame to a scalable architecture.
⚡ Performance First
🏗️ Architecture Matters
📦 Scale with Structure
Mobile Engineering Workshop Series
Performance & Architecture Foundations
Yang Akan Kita Pelajari
🗺️
Section 06
Overview & Arsitektur Clean Arch
🌐
Section 07
HTTP Client & Interceptor (Dio)
❌
Section 08
Error Mapping: Exception → Failure
🚀
Section 09
Concurrent Request, Streaming, & Cancellation
🏛️
Section 10
Repository Pattern: Full Clean Arch
Section 6 of 10
Overview & Arsitektur
Memahami apa itu API Integration dan mengapa Clean Architecture adalah fondasi yang wajib ada.
Apa itu API Integration?
Setiap aplikasi mobile membutuhkan data dari server — API Integration adalah jembatan yang menghubungkan keduanya.
📡 Alur Request − Response
Flutter App
(kamu)
HTTP Request
POST /login
Backend Server
REST API
↓
Flutter App
(tampilkan data)
JSON Response
{ "token": "..." }
Kenapa butuh Clean Architecture?
●Kode terorganisir — mudah dibaca tim lain
●Mudah diganti — misalnya ganti Dio ke http tanpa ubah UI
●Mudah dites — setiap bagian bisa ditest sendiri-sendiri
Tiga Lapisan Clean Architecture
Clean Architecture memisahkan kode menjadi tiga lapisan dengan dependency yang hanya mengalir satu arah.
Presentation Layer
UI & State
• Widget / Page
• Notifier / ViewModel
• State: loading, success, error
⬇ dependency mengalir ke bawah
Domain Layer
Business Logic
• Entity (data murni Dart)
• UseCase (aturan bisnis)
• Repository (contract)
⬇ dependency mengalir ke bawah
Data Layer
Implementasi
• Model (JSON parsing)
• RemoteDatasource (Dio HTTP call)
• RepositoryImpl
⚠️ Domain TIDAK BOLEH import apapun dari Data atau Presentation
Section 7 of 10
HTTP Client & Interceptor
Menggunakan Dio sebagai HTTP client yang powerful dengan interceptor untuk otomatis mengelola autentikasi token.
Setup Dio — HTTP Client Flutter
Dio adalah HTTP client terpopuler untuk Flutter yang jauh lebih powerful dibanding package http standar.
💡 Dio itu seperti kurir — kamu kasih alamat (URL) + isi paket (body),
dia yang kirim & terima balasannya.
Kenapa Dio, bukan http?
✅Interceptor (middleware)
✅Auto JSON parsing
✅Cancel token
✅Upload/download + progress
✅Timeout configuration
✅Retry mechanism
💡 Selalu buat Singleton DioClient — satu instance di seluruh aplikasi agar interceptor dan konfigurasi konsisten di mana saja.
Auth Interceptor — Otomatis Kirim Token
Interceptor memungkinkan kamu inject token otomatis ke setiap request tanpa perlu menulis ulang kode di setiap API call.
🔄 Alur Auth Interceptor
Request
Dikirim
Interceptor
Cek Token
Inject
Bearer Token
Server
Balas
401?
Refresh Token
Apa yang terjadi saat token expired (401)?
1
Server balas 401 → Interceptor menangkap error ini
2
Interceptor request token baru ke /auth/refresh
3
Simpan token baru ke Secure Storage
4
Ulangi request asli dengan token baru — user tidak sadar!
⚠️ Gunakan Dio terpisah untuk refresh token → hindari infinite loop!
Section 8 of 10
Error Mapping
Memisahkan error teknis (Exception) dari error bisnis (Failure) agar UI tidak tahu detail implementasi layer bawah.
Dua Lapis Penanganan Error
Setiap error melewati dua transformasi: dari detail teknis ke pesan yang bisa dimengerti oleh Domain dan UI.
💡 Analoginya: Mesin error = Exception. Laporan ke bos = Failure.
Bos tidak perlu tahu detail teknisnya.
Bos tidak perlu tahu detail teknisnya.
▶▶
maps to
💡 Exception bersifat teknis (misal: SocketException). Failure bersifat bisnis (misal: NetworkFailure). Domain Layer hanya kenal Failure.
Either<L, R> — Sukses atau Gagal
Either adalah tipe data functional yang memaksa kamu menangani kedua kemungkinan — sukses maupun gagal.
💡 Either = kotak yang isinya salah satu:
Left(gagal) atau Right(berhasil). Tidak bisa keduanya sekaligus.
Left(gagal) atau Right(berhasil). Tidak bisa keduanya sekaligus.
🚀 Dengan Either, tidak ada exception yang tidak tertangani — compiler memaksa kamu menulis handler untuk Left (gagal) dan Right (sukses).
Section 9 of 10
Concurrent & Streaming
Kirim beberapa request bersamaan untuk performa maksimal, dan kelola streaming data serta pembatalan request yang tidak lagi dibutuhkan.
Request Barengan = Lebih Cepat! 🚀
Sequential = tunggu satu selesai baru mulai berikutnya. Concurrent = kirim semua bersamaan, tunggu yang paling lama.
Sequential (Lambat) 😴
Profile (3s)
Stats (2s)
Notif (1s)
Total: 6 detik 😴
Concurrent / Parallel (Cepat) 🚀
Profile (3s)
Stats (2s)
Notif (1s)
Total: 3 detik 🚀
⚡ Future.wait gagal seluruhnya jika satu request saja error. Tangani per-request jika kamu ingin partial success.
Streaming & Cancellation
Tiga pola penting untuk real-time data dan UX yang responsif — download, AI output, dan search debouncing.
📥
Download File + Progress Bar
Tampilkan % progress saat download. User bisa tap tombol 'Batal'.
dio.download(url, path,
  onReceiveProgress:
    (recv, total) {
    progress = recv/total;
  },
  cancelToken: token,
);
🤖
AI Streaming (SSE)
Teks muncul pelan-pelan seperti ChatGPT. Server kirim data bertahap.
await for (
  final chunk in stream
) {
  yield content;
}
🔍
Search + Cancel Token
Request lama dibatalkan otomatis saat user mengetik huruf baru.
_cancelToken?.cancel(
  'new search');
_cancelToken =
  CancelToken();
await search(
  query, token);
💡 CancelToken adalah senjata rahasia UX — batalkan request usang agar tidak ada response basi yang menimpa hasil terbaru di layar user.
Section 10 of 10
Repository Pattern
Pola arsitektur yang memisahkan sumber data dari logika bisnis — membuat kode mudah diganti, dites, dan dikembangkan.
Repository Pattern — Perantara yang Rapi
Repository adalah kontrak (interface) antara Domain dan Data — UseCase hanya berinteraksi lewat kontrak ini.
💡 Repository = perantara antara Domain dan Data.
UseCase tidak perlu tahu dari mana data datang (API / DB / Cache).
UseCase tidak perlu tahu dari mana data datang (API / DB / Cache).
🏛️ Alur Repository Pattern
Widget
UI
Notifier
State
UseCase
Logic
Repository
Interface
RepoImpl
Data
Datasource
Dio API
🔄 1 Interface, banyak impl
Bisa ganti dari API ke database tanpa ubah UseCase
🛡️ Error handling terpusat
DioException → AppException → Failure, semua di Repository
🧪 Mudah di-mock saat test
Test UseCase tanpa perlu internet sungguhan
End-to-End: Alur Login dari Tap hingga Tampil
Tracing satu aksi user melalui seluruh lapisan Clean Architecture sampai data dikembalikan ke UI.
1
User tap tombol Login
2
AuthNotifier.login(email, password)
3
LoginUseCase.execute()
4
AuthRepository.login()
5
Dio POST /auth/login → JSON → UserModel
Jika SUKSES:
Right(user) ✅
state = AuthSuccess
"Welcome, Alice!"
Jika GAGAL:
Left(failure) ❌
state = AuthError
"Cek koneksi kamu"
Either<Failure, User>
🎯 Clean Architecture bukan soal folder structure — tapi soal arah dependency. UI bergantung pada Domain, tapi Domain tidak pernah bergantung pada UI atau Data.
Ringkasan — Apa yang Sudah Kita Pelajari
🎉
Selamat! Kamu Sudah Siap!
Kamu sekarang sudah tahu cara menghubungkan Flutter ke server dengan struktur yang rapi dan siap production.
🔌 Implementasi DioClient
🏛️ Login dengan Clean Arch
🧪 Unit test Repository
📡 Coba streaming SSE
Keep building! 💙
Flutter Mobile Development · Intermediate Series